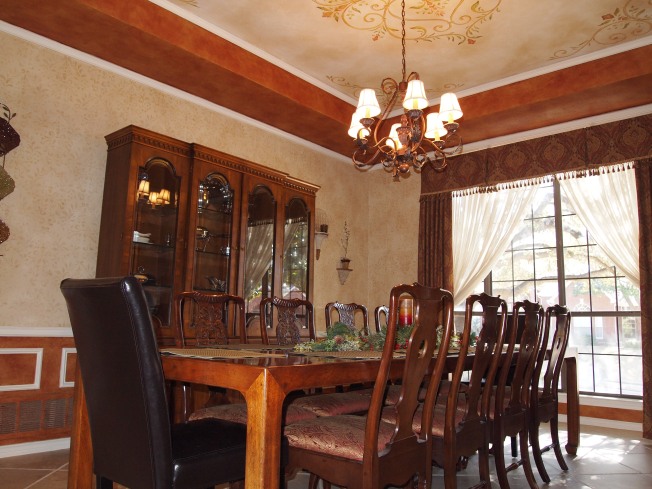
In my former life (before I traded in my paint brush for a bottle scrub brush) I got to do a lot of cool painting in a lot of amazing houses. When we got our own house, I wanted it to be a showplace to display some of my work for prospective clients. Since the dining room is one of the first rooms people see when they entered our house I wanted it to be really awesome so I spent a lot of time painting in there before I was satisfied!
I started by scraping all the popcorn off the ceiling (which I totally recommend doing before you move your furniture into a house, it’s not hard but VERY tedious and messy) then I painted the ceiling a light cream color of latex paint in an eggshell finish. I painted the walls with a darker cream color that I used on the walls throughout the house and below the chair rail I painted a dark gold hue, which I also used on the outer rim of the ceiling (all eggshell finish latex paint, which is what I always use for the base coat if I plan on glazing on top of it).
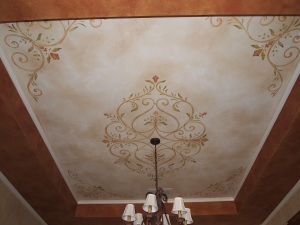
To create the painted design on the ceiling, I made a huge stencil out of dry-erase poster board (which is much cheaper than large sheets of stencil paper). The stencil was 1/4 of the pattern so I used a lazer and yard stick to get it lined up so it was centered in the tray ceiling. Then I stenciled each of the 4 quadrants with light gold latex paint, leaving the pattern very faintly on the ceiling. I also did this with the stencils I made for the corners of the ceiling.
Once it was dry I hand-painted over the stencils with gold, brown, green, terra-cotta, and red hues, using some glazing medium to allow the paint to go on more smoothly and be more workable. I wanted the design to look hand-painted so the original stencil was completely covered by the hand-painted designs.
Once that was dry, I went over the whole ceiling with a light glaze to make it all look antique.
For the upper part of the walls, I used a damask stencil from Melanie Royal Designs. I used a stencil brush and gold paint to stencil the pattern all over the walls. Once it was dry I went over the stencils with a dry-brush application of the original wall color, to make the pattern look faded in some places. Once that was dry I went over the walls with a soft application of a light glaze (the same one I used on the ceiling) to make it look antique. When people see my walls they assume it is wallpaper but then when they look closer and see the orange-peel texture of the wall they realize it is all done with paint!
For the lower part of the walls, and the outside rim of the tray ceiling, I started out with the dark gold latex paint. I mixed up a brown glaze and painted it on, then ragged it off (leaving the rag marks) and then softened it with a badger brush. When that layer of glaze dried, I went over it with a red glaze which I brushed on unevenly with a chip brush and then blended with the badger brush. It turned out to be a great terra-cotta finish with lovely depth.
To finish off the room, I re-painted the molding (which hadn’t been done in 20+ years), re-covered the dining room chairs and made some curtains with beaded fringe. I’m so glad I put the time and effort into this room when I first moved in and had time to do things like that, so now I can just enjoy it! It’s the perfect place to host friends and family for special meals!
You might also like:


Serious wow. That looks aMAzing! Thanks for linking at Shine on Fridays, girl!!
What a pretty and sophisticated look. This is a big “wow” factor. I am a new FB friend visiting from Sugar and Spice. Vicky from Mess For Less
Thanks, I’m following you now too:)
The ceiling is so pretty!! I really like the stencil and it adds a great focal point to the room!
I still love this transformation too! Your hubs is a lucky man; he has one industrious wife!
OK You are are one talented lady! This must have taken forever! Thanks for sharing!
So fantastic. Thanks for showing your talent – very impressive!
Beautiful!!
Your work is amazing and so detailed. Great job! I would love for you to consider linking this up at my “Drab to Fab” party every friday over at my blog Sugar and Spice. You can read all about the link party here:
http://www.amynjesse.com/p/drab-to-fab.html
Really hope to see you on Friday!
Your stencil came out great. I love the detail of dry brushing over it, great idea.
A few blogger friends and I have collectively introduced a fun challenge for January. It would be so awesome if you want to participate! http://thespacebetweenblog.wordpress.com/2012/01/09/imagine-the-impossibilities-challenge/
Karah @ thespacebetweenblog